图像处理基础(一),旋转矩阵的通俗理解及其简单应用
发表于: 2021-03-23 19:25:00 | 已被阅读: 864 | 分类于: 图像处理基础
旋转是处理二维图像的基本操作之一。本文要谈的旋转矩阵可以拆分为两个词来理解——“旋转”和“矩阵”,前者即表示将目标旋转一定角度的操作,后者则记录着旋转的具体信息。
坐标系的基
坐标系中的坐标点一般可以写为模乘以基的形式,以二维直角坐标系为例:

假设 \( p_0 \) 点的坐标为 \( (x_0, y_0) \),那么 \( p_0 \) 点可以写成:
\( $p_0 = x_0\cdot \overrightarrow{\mathbf{x}} + y_0\cdot \overrightarrow{\mathbf{y}} = [x_0, y_0 ]\begin{bmatrix}\overrightarrow{\mathbf{x}}\\\overrightarrow{\mathbf{y}}\end{bmatrix} \)$
其中 \( \begin{bmatrix}\overrightarrow{\mathbf{x}}\\ \overrightarrow{\mathbf{y}}\end{bmatrix} \) 即为坐标系的基。就本例而言,
\( $\begin{bmatrix}\overrightarrow{\mathbf{x}}\\\overrightarrow{\mathbf{y}}\end{bmatrix} = \begin{bmatrix}1, 0\\0, 1 \end{bmatrix} \)$
因此
\( $p_0 = [x_0,y_0] \begin{bmatrix}\overrightarrow{\mathbf{x}}\\\overrightarrow{\mathbf{y}}\end{bmatrix}= [x_0,y_0] \begin{bmatrix}1, 0\\0, 1 \end{bmatrix} = [x_0,y_0] \)$
可见,如果选择单位正交基作为坐标基,那么此时坐标值本质上只是模长,坐标的方向由基描述。对于二维直角坐标系,我们常常默认它的坐标基与坐标轴方向一致,而且为单位基,因此两个数字即可描述一个坐标。
事实上,脱离了具体的坐标系(基),单独的两个数字并不能说明点的具体位置,请看下图:

点 \( p_1(1, 1) \) 和点 \( p{'}_1(1{'}, 1{'}) \) 的坐标值是相等的,但是前者位于 \( xoy \) 坐标系,后者位于 \( x{'}oy{'} \) 坐标系,二者的位置并不相同。
假设坐标系使用的坐标基为沿着坐标轴方向的单位基,下文若没有特殊说明,也是如此。
坐标系的相对性
我们已经明白坐标系中的坐标点是相对于坐标基而言的,因此,即使同样的坐标值,使用不同的坐标基也可以表示不同的位置,换句话说,固定位置点在使用不同坐标基表达时,坐标值不同。

假设平面中有个确定的位置点 \( p_1 \),它在坐标系 \( xoy \) 中的坐标值为 \( p_1(1, 1) \),若 \( \theta = 45\degree \) ,那么点 \( p_1 \) 在坐标系 \( x{'}oy{'} \) 中的坐标值 \( p{'}_1 \) 为多少呢?答案很简单:
$$p^{x{'}oy{'}}_1 = x_1 \cdot \vec{\mathbf{x{'}}} + y_1 \cdot \vec{\mathbf{y{'}}} = [x_1, y_1
]\begin{bmatrix}\overrightarrow{\mathbf{x{'}}}\\overrightarrow{\mathbf{y{'}}}\end{bmatrix} $$
只要求出 \( x{'}oy{'} \) 相对于 \( xoy \) 的坐标基 \( \begin{bmatrix}\overrightarrow{\mathbf{x{'}}}\\\overrightarrow{\mathbf{y{'}}}\end{bmatrix} \) 即可。我们可以轻易的写出坐标系 \( x{'}oy{'} \) 的一组正交单位基 \( [1{'}, 0]^{T} \) 和 \( [0, 1{'}]^{T} \),它们在坐标系 \( xoy \) 中的表示为 \( [cos(\theta), sin(\theta)]^{T} \) 和 \( [-sin(\theta), cos(\theta)]^{T} \),即
\( $\begin{bmatrix}\overrightarrow{\mathbf{x{'}}}\\\overrightarrow{\mathbf{y{'}}}\end{bmatrix} = \begin{bmatrix} cos(\theta), -sin(\theta)\\ sin(\theta), cos(\theta) \end{bmatrix} \)$
因此点 \( p_1 \) 在坐标系 \( x{'}oy{'} \) 中的坐标值为:
\( $p^{x{'}oy{'}}_1 = [x_1,y_1]\begin{bmatrix}\overrightarrow{\mathbf{x{'}}}\\\overrightarrow{\mathbf{y{'}}}\end{bmatrix} = [1,1]\begin{bmatrix}cos(45\degree), -sin(45\degree)\\sin(45\degree), cos(45\degree) \end{bmatrix} = [ \frac{\sqrt{2}}{2} + \frac{\sqrt{2}}{2}, -\frac{\sqrt{2}}{2} + \frac{\sqrt{2}}{2}]= [\sqrt{2},0 ] \)$
在初中物理中,我们已经明白运动是相对的概念,例如一辆汽车从西边向我(西->东)驶来,这是相对于“我”来说的。从“汽车”的视角来看,我是从东边向它(东->西)驶去的。
同样的道理,从坐标系 \( xoy \) 的视角来看,点 \( p_1 \) 位于第一象限的中间,但是从坐标系 \( x{'}oy{'} \) 的视角来看,点 \( p_1 \) 位于第一象限的边界(坐标轴),中间->边界,相当于顺时针旋转了 \( \theta \) 角。
坐标系 \( x{'}oy{'} \) 相对于 \( xoy \) 逆时针旋转了 \( \theta \) 角,根据运动的相对性,从坐标系 \( x{'}oy{'} \) 的视角来看,点 \( p_1 \) 顺时针旋转了 \( \theta \) 角。
事实上,坐标系 \( xoy \) 中的任意点 \( (x, y) \) 经过 \( \begin{bmatrix}\overrightarrow{\mathbf{x{'}}}\\\overrightarrow{\mathbf{y{'}}}\end{bmatrix} \) 处理后,都相当于顺时针旋转了 \( \theta \) 角,所以称 \( \begin{bmatrix}\overrightarrow{\mathbf{x{'}}}\\\overrightarrow{\mathbf{y{'}}}\end{bmatrix} \) 为旋转矩阵。在二维图像处理中,旋转矩阵可以帮助我们实现旋转图像的操作,稍后将以实例说明。
二维图像的坐标系
以二维图像为例,一般来说,在图像处理中,我们常常认为组成图像的各个像素点具备两大类信息:位置和像素值。位置通常由一对坐标值给出,因此(13, 24, 203)可以看作是位于 (13, 24) 处,值为 203 的像素。

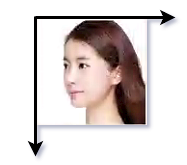
当然,坐标是相对于坐标系而言的,我们通常视图像的水平边为横轴,竖直边为纵轴,左上角为原点,如上图所示。
旋转图像
前面提到“旋转矩阵可以帮助我们实现旋转图像的操作”,接下来将以上图为输入,编写 Python 代码实现图像旋转。
首先,读入图片:
import cv2

img = cv2.imread('test.jpg')
img_h, img_w = img.shape[:2]  # 图像的高和宽
以旋转 30\( \degree \) 为例,计算旋转矩阵:
theta = np.pi / 6  # 30 度
rotate_matrix = [[np.cos(theta), -np.sin(theta)], [np.sin(theta), np.cos(theta)]]
图像旋转后,若希望仍然完全显示,则需要使用更大的画板,计算所需画板的宽高,以及存放像素的偏移:
offset_h = int(np.sin(theta) * img_h)

target_w = np.ceil(img_w * np.cos(theta) + img_h * np.sin(theta)).astype(np.int32)
target_h = np.ceil(img_h * np.cos(theta) + img_w * np.sin(theta)).astype(np.int32)
计算每个像素旋转后的坐标,并且把对应的像素拷贝到目标画板 target_img 中:
target_img = np.zeros((target_h, target_w, 3), dtype=np.uint8)
for h in range(img_h):
	for w in range(img_w):
		new_wh = np.dot([w, h], rotate_matrix) + np.array([0, offset_h])

		tw, th = np.floor(new_wh).astype(np.int32)
		target_img[th:th+2, tw:tw+2, :] = img[h, w, :]
显示原始图像和旋转后的图像
cv2.imshow('raw', img)
cv2.imshow('rotated', target_img)
cv2.waitKey(0)
得到结果:

